According to users, Windows 10 Wi-Fi isn’t connecting automatically, and today we’re going to show you how to fix that problem.
How can I fix a Wi-Fi that doesn’t connect automatically?
1. Change the properties of your wireless connection
If Windows 10 Wi-Fi isn’t connecting automatically, you might be able to fix the problem by changing the properties of your wireless connection. This is relatively simple, and you can do it by following these steps: After enabling this option the problem should be resolved and you’ll be able to use your wireless connection without any issues.
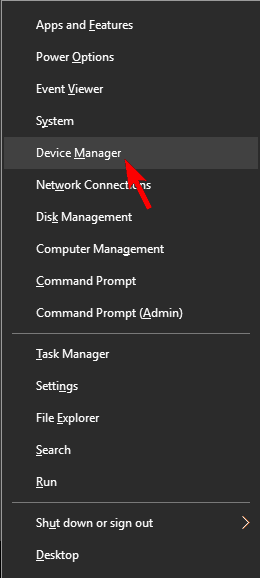
2. Reinstall your Wi-Fi driver
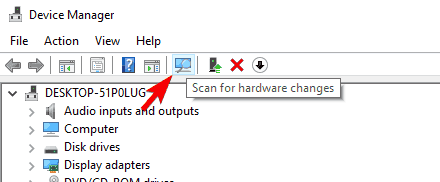
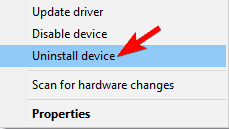
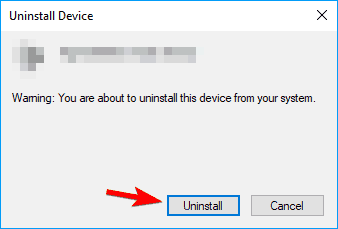
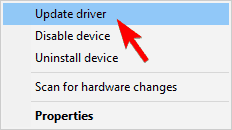
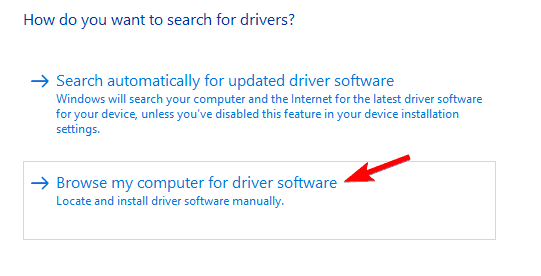
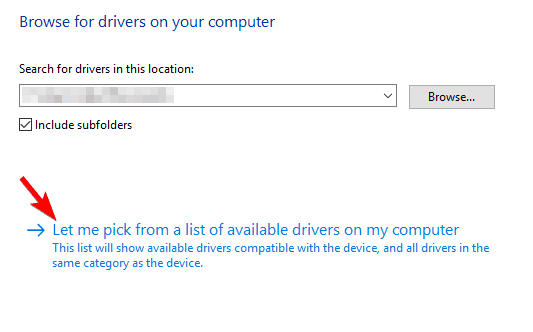
According to users, you might be able to temporarily fix this problem by reinstalling your Wi-Fi driver. Once your driver is installed, the problem with Wi-Fi should be resolved completely. Few users claim that this is just a workaround, so if the problem appears again you might want to download and install the latest driver for your Wi-Fi adapter. Update drivers automatically After uninstalling the drivers, you might want to search for them on the manufacturer’s website. It is very important to choose the right driver versions. However, if you don’t want to risk installing an older version, or the wrong driver, then you might as well use a third-party drive updater to do the job for you instead.
3. Change Group Policy settings
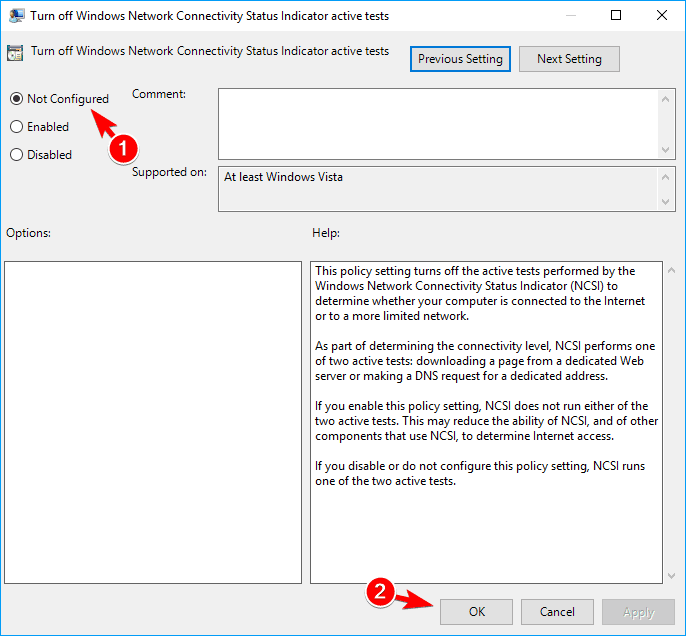
To fix this problem, do the following: Disclaimer: this program needs to be upgraded from the free version in order to perform some specific actions. Group Policy is a useful feature that allows you to make system-wide changes on your PC. According to users, you might be able to fix this problem simply by making a few changes using the Group Policy Editor. We have to mention that this feature is available only on Professional and Enterprise versions of Windows, so if you’re using any other version you might not have this feature available. By default, this policy is set to Not Configured, but for some reason, it might become enabled on your PC, so we advise you to check your Group Policy settings. Most Windows 10 users have no idea how to edit the Group Policy. Learn how you can do it by reading this simple article.
4. Remove all saved Wi-Fi networks
If Windows can’t connect to a Wi-Fi network automatically, you might be able to fix the problem by removing all saved Wi-Fi networks. You can also forget all saved networks by using the Command Prompt. This is a bit advanced solution since you have to use a command line, so if you’re a basic user you might want to skip it. To delete saved Wi-Fi networks with Command Prompt, you need to do the following: This method is a bit advanced, but it might be faster to use if you’re familiar with Command Prompt. Both methods from this solution will have the same results, so feel free to use any of them. After removing all saved networks, you just have to connect to your network and enter its password and the problem should be resolved. Some users claim that you just have to delete your own Wi-Fi network from the list of saved networks, so be sure to try that first.
5. Use PROSet software
Several users reported that using the PROSet software fixed the problem for them. For some reason, there was a one-minute delay on their PC before the computer could connect to a Wi-Fi network automatically. However, after installing PROSet software the problem was completely resolved. According to users, they used a Cisco wireless router, so that can also be a part of the problem. Even if you don’t use Cisco’s network device, feel free to try this software. If you have a Wi-Fi exclamation mark on Windows 10, check our dedicated guide that will help you solve the problem.
6. Modify your registry
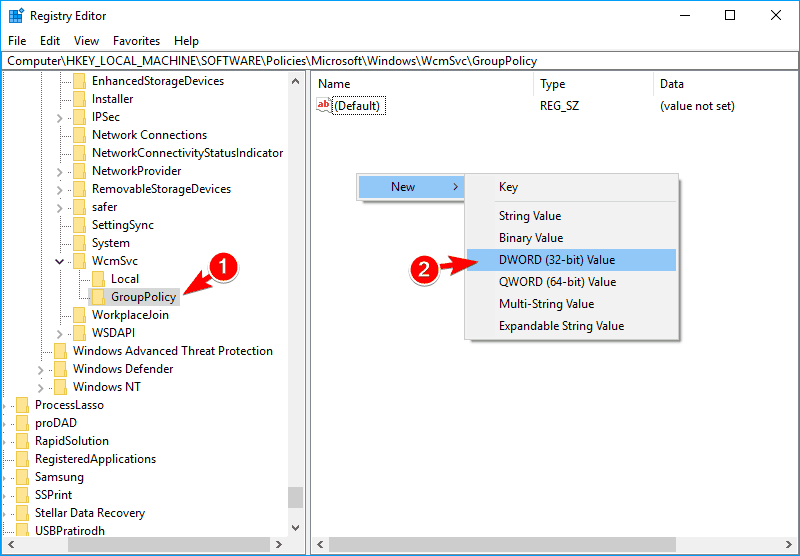
Your registry holds sensitive information, and by modifying it you can change hidden Windows settings. Several users claim that they fixed the problem simply by making a couple of small changes to their registry. Once your PC restarts, the problem should be resolved and your PC will automatically connect to the Wi-Fi network. If any problems occur, you can simply delete the GroupPolicy key you created to fix them. If you can’t edit your Windows 10’s registry, read this handy guide and find the quickest solutions to the issue.
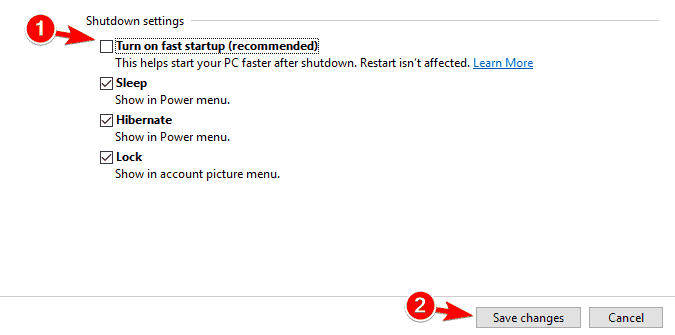
7. Turn off the Fast Startup feature
Windows 10 has a useful feature called Fast Startup. This feature is enabled by default, and it will save your data when turning off your PC. As a result, your PC will boot faster the next time you turn it on. This is a useful feature, but it can sometimes cause certain issues to appear. Users reported that Fast Startup is the cause of this problem. After turning this option off, your PC might boot a bit slower, but your Wi-Fi problems should be resolved. You can’t open Control Panel? Take a look at our step-by-step guide to finding a solution.
8. Install the latest drivers manually
These types of problems are usually caused by your drivers, but in most cases, you can fix them simply by updating your drivers to the latest version. After you install the driver manually, the problem should be resolved and you’ll be able to connect to the wireless network without any problems.
9. Replace your wireless adapter
If Windows 10 can’t automatically connect to the Wi-Fi, you might want to try replacing your wireless adapter. Some wireless adapters aren’t fully compatible with Windows 10, and that can be the case with your adapter. If that’s so, you need to replace your wireless adapter with a different model and check if that solves the problem. This is a drastic solution, and you should use it only if other solutions from this article can’t fix your problem. Most wireless adapters are fully compatible with Windows 10, but if you’re using an unknown brand, you might experience this problem on your PC. If you’re having wireless adapter or access point issues on Windows 10, take a look at this awesome guide to solve them.
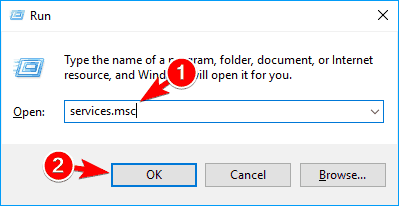
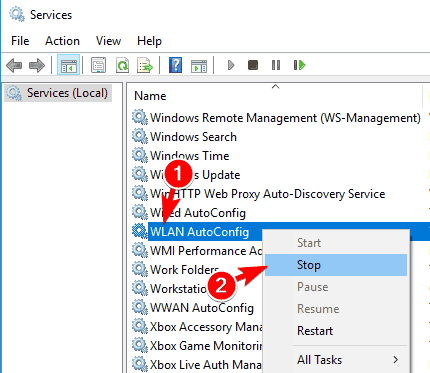
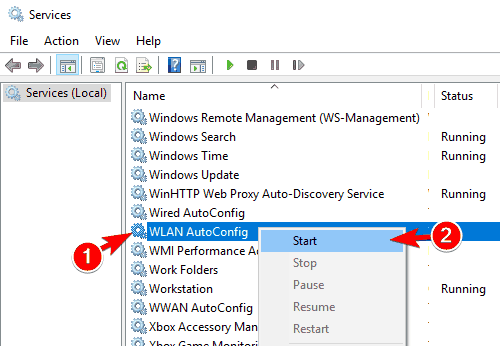
10. Remove files from Wlansvc directory
This problem can sometimes be caused by files inside the Wlansvc directory. To fix the issue, you need to disable the WLAN AutoConfig service and remove the problematic files. After doing that, you just have to restart your computer and check if that solves the problem. A few users are also suggesting going back to this directory and locating the newly created .xml file in one of the folders: SPONSORED C:ProgramDataMicrosoftWlansvcProfilesInterfaces This .xml represents your network connection, and to fix the problem, you need to right-click this file and choose Properties from the menu. Now go to the General tab and check the Read-only option in the Attributes section. Click on Apply and OK to save changes. According to users, it seems that Windows was modifying the .xml file causing this problem to appear. By setting the file to Read-only mode, the problem was resolved completely.
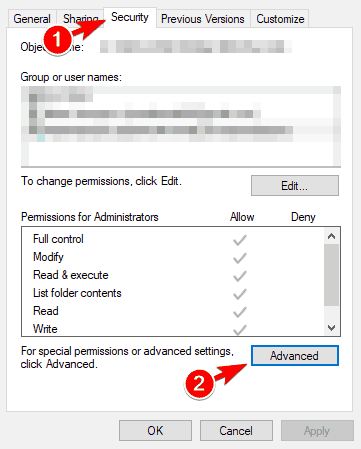
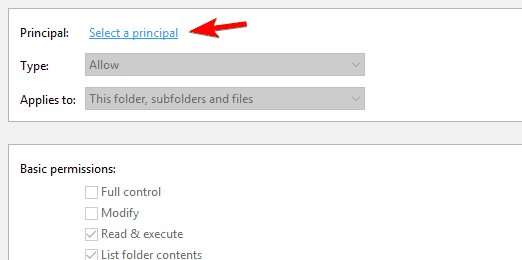
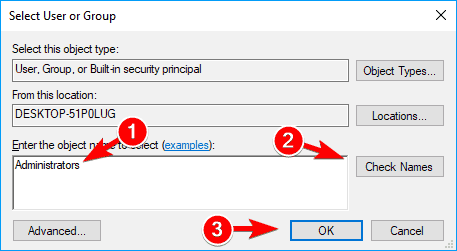
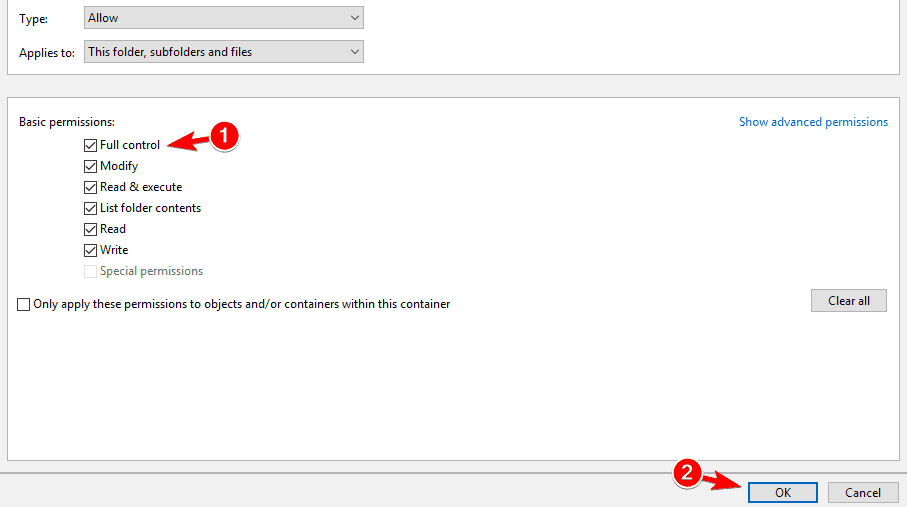
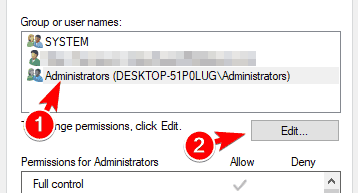
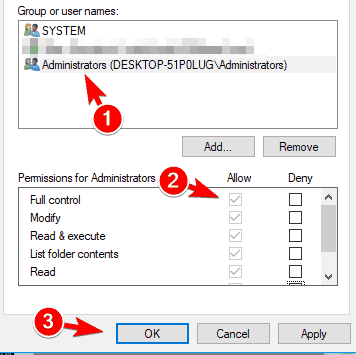
11. Change the security permissions
As we already mentioned, your Profiles folder can sometimes cause problems with Wi-Fi to occur. After doing that, the problem should be resolved and you’ll be able to connect to your wireless network without any issues.
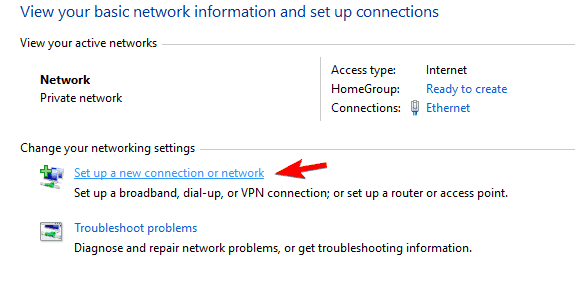
12. Create a new wireless network connection
According to users, you might be able to solve this problem simply by creating a new wireless network connection. Before you do that, you might have to remove your wireless connection. After doing that, you’ll have a new connection ready and Windows will automatically connect to it. If your Wi-Fi icon is missing on Windows 10, get it back by following this simple guide.
13. Remove any third-party wireless software
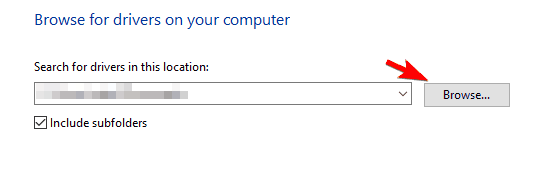
Many wireless adapters come with their own software that can help you configure your wireless network. To fix this problem, you need to remove any wireless configuration software that came with your wireless adapter. Keep in mind that removing this software can also remove drivers for your wireless adapter. To fix the issue, you need to reinstall your drivers, but be sure not to install any wireless configuration software. The simplest way to do that is to install the drivers manually. In some cases, Windows will ask you if you want to use Windows or third-party software to control the wireless device. If that happens, be sure to choose Windows. Users reported that sometimes third-party wireless control software can start automatically with Windows causing this problem to appear. To fix the issue, you need to manage your startup items and prevent the software from starting automatically with Windows. Users reported problems with Netgear software, but the problem can also appear with software from other manufacturers.
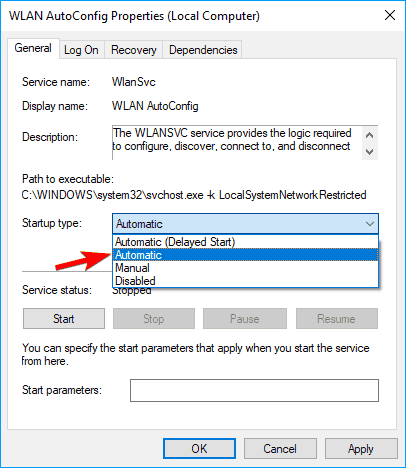
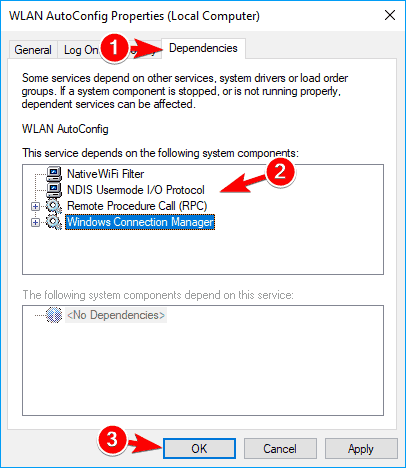
14. Set WLAN AutoConfig service to Automatic
According to users, the problem can occur if the WLAN AutoConfig service isn’t set to Automatic. After making the necessary changes in the Services window the problem should be resolved entirely.
15. Perform DISM and SFC scan
File corruption can occur on any PC, and sometimes if your system files are corrupted you might experience this problem. According to users, you might be able to fix this issue by using the SFC scan. If the SFC scan can’t fix the problem or if you can’t run it at all, you might want to use the DISM scan instead. To do that, start Command Prompt as administrator and enter: Dism /Online /Cleanup-Image /RestoreHealth. After the DISM scan is completed you should be able to run an SFC scan without any problems.
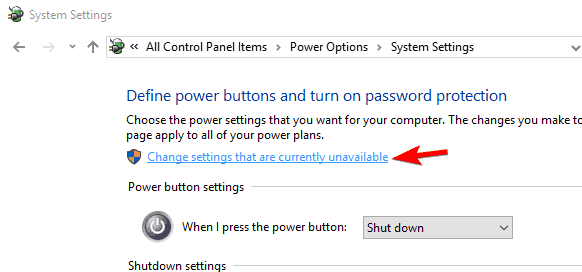
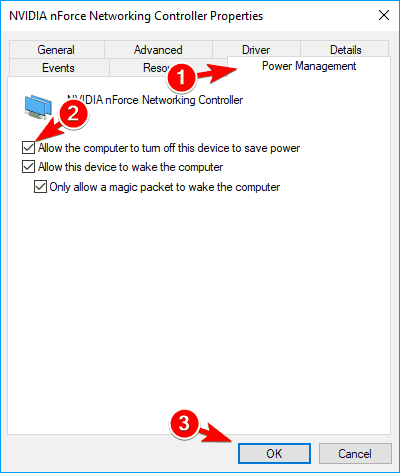
16. Change your device’s power settings
Several users reported that Windows 10 Wi-Fi isn’t connecting automatically after waking up their PC from hibernation. According to users, the issue seems to be caused by your device’s power settings. After enabling this option, your computer will always turn off your wireless adapter when your PC enters hibernation or Sleep Mode. Users reported that this solution fixes this problem when waking your PC from hibernation, but feel free to try it even if you don’t use the hibernation feature on your PC. Several users reported that this option automatically turns back off after you install a new build of Windows, so if you install any major update, be sure to turn on this feature again. We also have to mention that a few users claim that disabling Allow the computer to turn off this device to save power option fixed the problem for them, so be sure to try it out.
17. Change your router settings
According to users, this problem can occur if you’re using both Ethernet and Wi-Fi connections on your PC. Sometimes your PC might prefer Ethernet over your Wi-Fi connection causing the problem to appear. It seems that this issue is caused by your router settings, and in order to fix that problem, you need to do the following: After turning this feature off, the problem should be resolved and your PC will automatically connect to a Wi-Fi network without any problems. Keep in mind that all routers are different, so you might need to take slightly different steps to disable this feature. For detailed instructions on how to disable this feature, we advise you to check your instruction manual.
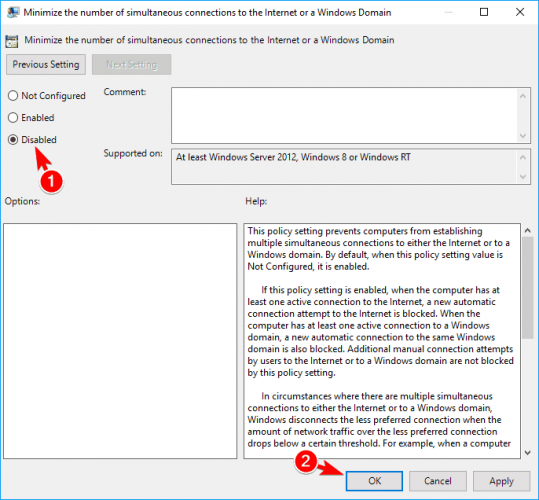
18. Minimize the number of simultaneous connections
According to users, you might be able to fix this problem simply by making a couple of changes in Group Policy Editor. To fix the issue, you just need to find and disable Minimize the number of simultaneous connections policy. This setting prevents establishing multiple connections to the Internet, so if you’re already connected to the Internet using an Ethernet connection, your PC won’t connect automatically to the Wi-Fi network. After disabling this setting, the problem with your Wi-Fi connection should be completely resolved.
19. Change your router’s security
This is just a workaround, so it might not be the best permanent solution. Changing your router’s security isn’t advised since some security standards are less secure than others. By using this method you’ll reduce the security of your wireless network, so be sure to keep that in mind. Several users claim that the problem appears while using WPA 2 security to secure the wireless network. According to users, switching the wireless security from WPA or WPA 2 to WEP fixed the problem for them. We have to warn you that the WEP security standard is outdated, so it’s always better to use WPA 2 standard instead. Almost all wireless devices are fully compatible with WPA 2 standard, and if your device has a problem with it, you might have to check its settings or update your drivers. To switch to WEP security, you just have to log in to your router and select WEP security from the Wireless section. For more instructions on how to do that, we advise you to check your router’s instruction manual. Once again we have to mention that WEP security is outdated, and if you’re going to use it, use it only as a temporary solution. As you can see, this can be an annoying problem, but we hope that you’ll manage to solve it by using one of our solutions. If you have any more questions, don’t hesitate to leave them in the comments section below and we’ll be sure to check them out.
Name *
Email *
Commenting as . Not you?
Save information for future comments
Comment
Δ


![]()
